Part of the beauty of a good tiling job is being able to admire the perfectly spaced tiles – and on the flipside, nothing makes a tiled surface look more shoddy than uneven spacing. So how do you achieve this stunning symmetry in your work? With tile spacers, of course! These little plastic marvels may be small but they can have a big impact on the final look of your tiling job.
In this article we will talk you through everything you need to know about tile spacers, including what they are, how to use them, and some other handy insider tips.
What are tile spacers?
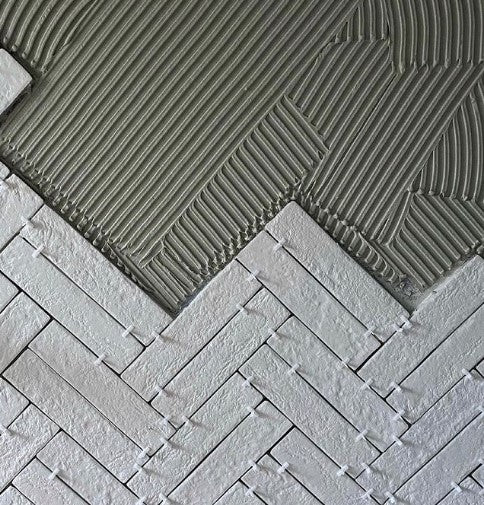
A tiler’s saviour, that’s what! But from a physical perspective, tile spacers are small bits of plastic that you place between tiles during installation to achieve a consistent width throughout your joints. This allows for an even finish when grouting your tiles. Usually cross- or T-shaped, they come in a variety of sizes to accommodate for different tile width preferences – so you are bound to find the right spacers to achieve your desired aesthetic.
Can you tile without spacers?
We certainly wouldn’t recommend tiling without spacers. From a technical point of view, tiles are more vulnerable to breakage and popping when installed without the help of spacers. Thanks to their thermal properties, tiles can expand and contract – however unnoticable this may be to the human eye. Using tile spacers ensures that there is enough room for this natural process to occur without the tiles sustaining any damage.
From an aesthetic perspective, you will probably wind up with an uneven result without spacers. Even if you are using a laser level or some other form of measuring device, the spacers hold your tiles in place while they set. Even a small amount of expansion without a spacer to brace your tiles can throw everything off. Tile spacers are relatively inexpensive, so it’s one of those cases where being safe is better than being sorry.
Can you grout over tile spacers?
Short answer: just because you can doesn’t mean you should. Grouting over your tile spacers will lead to a sub-standard end result, particularly with floor tiles. If your spacers don’t protrude over the tiles, it may be tempting to just grout over them – but you’ll wind up paying for it down the track. The finished job might look great, but over time the neglected spacers will compromise the structural integrity of the grout joint. You may eventually notice cross-shaped cracks appearing over the buried spacers as the grout grows weaker with time – not a good look.
What size spacers should you use?
The size of your spacers all comes down to personal preference, as it will directly impact the appearance of your grouting. There are some minimum standards to allow for movement and stress relief of tiles – generally 2mm for walls and 3mm for floors is sufficient. Beyond that, you can make a judgment call based on how you want your grout to look (or not look).
How long should you leave tile spacers in for?
The art of tile spacing requires some clever timing. It is important to leave your tile spacers in place while the adhesive is drying, but to remove the spacers before the tiles are fully adhered in place. It’s usually between 20-30 minutes, but double-check the manufacturer instructions on your adhesive packaging and make a note to get the spacers out before the tiles are fully adhered. This will make your life much easier, which brings us to our next point …
How do you remove stuck tile spacers?
So your needle-nosed pliers aren’t doing the trick and you’re dealing with a stubborn tile spacer – how do you get it out? Your two best friends in this situation will be a hammer and a very small flathead screwdriver. Very gently tap the head of the screwdriver under the end of one of the spacers using as little force as possible. Odds are it will pop out, but if not, use the method on the opposite side. Make your way around each end of the spacer and eventually you’ll get that sucker out.
How to use tile spacers: step by step
1. Find the center of the room and use a chalk line or laser level to create a gridline. This will ensure your first tile and spacers are centered and straight, setting you up for a perfect job.
2. Lay your first tile in accordance with your reference point.
3. Put a spacer on each corner of the tile, making sure each one is flush. Hint: When tiling a floor, it’s best to use two T-shaped spacers on each side (as well as the cross spacers on each corner). This helps with accuracy along the length of the tile.
4. Place the next tile up against the spacers of your center tile, then place additional spacers against the bare corners of the new tile.
5. Repeat this process, keeping your spacing process consistent.
6. When you reach an area where you don’t need a cross-shaped spacer, use a T-shaped spacer. Place the spacer with the flat end against the wall (or other surface). Haven’t got T-shaped spacers on hand? You can break one side off a cross-shaped spacer to create your own.
7. Remove the spacers after the tiles have been placed but before the adhesive fully seals. You can use either your fingers or needle-nosed pliers to get the spacers out.
8. Voila! You’re ready to start grouting your evenly-spaced tiles.
Don’t risk a dud tiling job
Now that you know how affordable, handy, and easy-to-use tiling spacers are, you can go forth with confidence on your next tiling adventure. If the bit of extra effort seems too much, just remember: you’ll be looking at these tiles for years to come, so it pays to do the job right!